Segmented List Upload & Segmented Campaigns
An email campaign with 500,000 contacts or more can be managed through a ‘segmented campaign’. Segmented campaigns allow for large contact lists to be parcelled into smaller packages that can be easily distributed without getting flagged as spam. We will cover both uploading segmented lists and creating segmented campaigns in the two steps, discussed below.
Step 1 – Uploading Segmented List
The built-in Segmented List Upload tool can be used to upload a large number of contacts into the itrac system. The tool automatically divides the upload process into multiple segments; where the number of contacts in each segment can be selected by the user. Contacts can be uploaded into the itrac system using a CSV file, or reside in a pre-existing itrac list. For the sake of this example, we are uploading a CSV file from a preconfigured FTP server location.
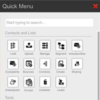
Figure – 1.0: Where to find the Segmented List Upload Button
In order to perform segmented list upload, first click on ‘Setup Tools‘ found under the ‘Admin‘ menu, and then select the ‘Segmented List Upload‘ button found under the ‘Manage Accounts‘ header.
The following screenshot shows the screen after clicking the ‘Segmented List Upload‘ button shown in Figure 1.0. Since the segmented list upload process may take a while due to the volume of contacts in the list, an email notification can be sent upon process completion. This is an optional feature, but highly recommended.
Figure – 1.1: Adding an Optional Email Address
Upon clicking the ‘Select CSV File For Upload Process‘ button, shown in Figure 1.1, a list of CSV files appear from those previously uploaded to the CSV File Directory from an FTP server. The list selection interface is shown in Figure 1.2.
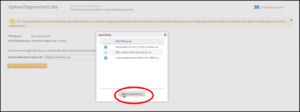
Figure – 1.2: CSV File Selection Interface
Once the file is selected, click on the ‘Continue Upload Process‘ button as shown in Figure 1.2. Once clicked, this button will bring you to a list customization/CASL page where you can select the attributes and CASL status for your list segments.
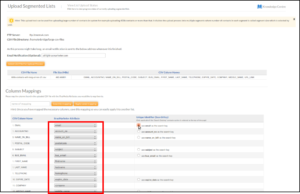
Figure – 1.3: Column mapping for various list attributes.
Once the list has been chosen, appropriate column mappings are required. You can select from either standard or custom attributes. These attributes should correspond to the column headings in your original CSV file. In Figure 1.3, attributes can be mapped in the same way as in a conventional itrac email campaign; by matching the column name to a standard or custom attribute from the drop down menu.
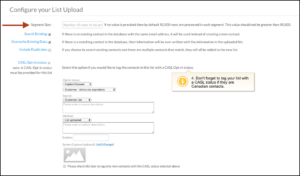
Figure – 1.4: Configuring segment size and CASL consent.
Below the column mappings are sections for configuring list segment size and selecting a CASL tag. These fields are shown in Figure 1.4, above. By default, the segments are broken into 50,000 contact segments.
The CASL fields and opt-ins are the same for a conventional email campaign and are discussed in detail in our Knowledge Center (http://knowledge.itracmarketer.com/).
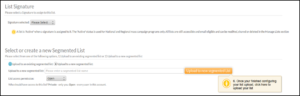
Figure – 1.5: List Signature and List Name
If you have signatures active for your account, you can select the appropriate signature from the drop down menu.
Choose a name for your segmented list and enter it into the text field. The name you choose will also be applied to the final upload in the segmented campaign process (this will be discussed further in Section 2, along with Figure 2.2). When all the fields are complete, click on the ‘Upload to new segmented List‘ button. Once the button has been clicked, it will generate a pop-up window to review the list parameters.
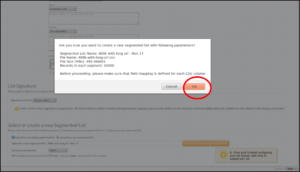
Figure – 1.6: Parameter review pop-up window.
Figure 1.6 shows the parameter review pop-up confirmation window. Prior to confirming the list upload, you can review the selected parameters and go back to make changes. Upon clicking the ‘OK‘ button, you will see a screen that displays an uploading message, as shown in Figure 1.7.
Figure – 1.7: Upload page redirect message.
Clicking on the highlighted link in the dialogue shown in Figure 1.7 will open the ‘View List Upload Status’ page, shown in Figure 1.8.
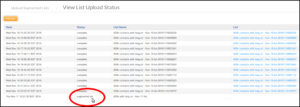
Figure – 1.8 List Upload table
A new record is added to the list upload table, as shown in the last record in above table on the View List Upload Status page in Figure 1.8, with a status of ‘segmented list‘. Within a minute, this status will change to ‘segmentation_processing‘. You can view the updated status of an uploading list segment by clicking the ‘Refresh‘ button, as shown in Figure 1.9.
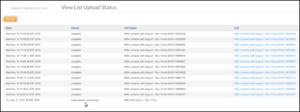
Figure – 1.9 Refresh to see the process Segment upload
Once the segmentation process begins, it will take some time until all the segments are created. For the 600,000 contacts in this example, it took 55 minutes to create the first segment, and the second segment took 36 minutes. The first segment takes additional time due to the background CSV file being copied from FTP server onto the server where the segmentation job is running. The time taken for the segmentation process depends on the size of CSV file and number of records in it: reading data from a large CSV file is much slower than reading data from a small CSV file. When the segments finish processing, they are shown with a status of ‘segment_new‘, as shown in Figure 1.10.
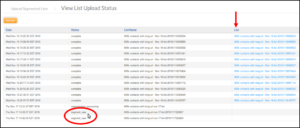
Figure – 1.10 ‘Segment_New’ status in the List Upload Status
For the 600 thousand contacts with a 50 thousand contact segment size used in this example, the segmentation process created 12 segments with a ‘segment_new‘ status. The ‘List’ column in the above Figure 1.0 contains the link to the uploaded contacts. During the segmentation process, the ‘List’ column remains blank. The ‘Status‘ column shows the upload percentage during the upload procedure. Once all the contacts are uploaded for a particular segment, its status is changed to ‘complete‘.
When all the contacts of all the segments are uploaded, the segmented list upload process is complete.
Once the segmented list upload process is finished (and the optional notification email is received), you can create a new Segmented Campaign by following the steps illustrated in the next section.
Step 2 – Creating a Segmented Campaign
Sending a segmented campaign to a large number of contacts is very similar to sending a conventional email campaign. In order to send out a segmented campaign, you must first navigate to the ‘Email Campaign‘ page from the top navigation bar, and select ‘Send An Email Campaign’ to view the page shown in Figure 2.0, below.
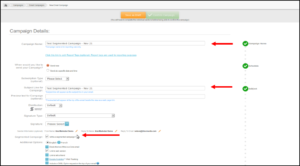
Figure – 2.0 Segmented Campaign Checkbox
Enter the campaign name, select a subject line and a time for deployment. Check the ‘Segmented Campaign‘ checkbox.
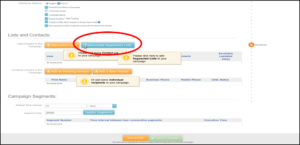
Figure – 2.1 Select/Add Segmented Lists button
From the ‘Lists and Contacts’ section, click the the blue button called ‘Select/Add Segmented Lists‘. A pop-up window will allow for the selection of your segmented lists, as shown in Figure 2.2, below.
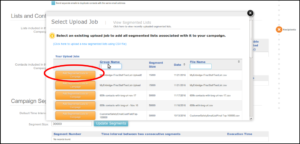
Figure – 2.2 Select Upload Job pop-up window
The pop-up window shows the list of ‘Your Upload Jobs’; a set of segmented lists that were created within the same upload process. Selecting one upload job will select all the corresponding list segments. You do not have to select each segmented list individually.
Select the upload job with same name that was used in Step 1 (see Figure – 1.5) and click the ‘Finished’ button to add the segmented lists to your campaign.
Figure 2.3 shows that all the segmented lists associated with the selected ‘Upload Job’ are loaded into the segmented campaign. Once the List Segments are selected for the campaign, we can schedule them for deployment.

Figure – 2.3 Segment lists included when Upload Job is selected.
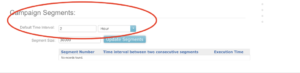
Figure 2.4- Setting the Time Interval between Segment deployment
As shown in the above ‘Campaign Segments‘ Figure 2.4, 12 segments were generated for the 600,000 contact example, with a segment size of 50,000 contacts. Please remember that the segment size value cannot be changed once it has been established in the upload process.
Each segment in the segmented campaign is treated as an individual campaign. The time interval value in the above section is used to set the send date (or processing date) of each segment. By default, the time interval is set to 2 hours. The time interval value can be changed as required, and this change can be applied to each segment by clicking on the ‘Update Segments‘ button.
Once all the time intervals have been set, the desired template can be selected by clicking the ‘Edit your Email Content or Change Templates’ button under the ‘Design your Email Content’ heading. Once a template is selected, click on the green ‘Confirm Campaign’ button. A pop-up window will allow you to review the campaign details and deploy the campaign segments. This window is shown in Figure 2.5, below.
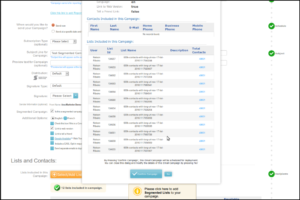
Figure – 2.5 Confirm Campaign screen
After reviewing the campaign details appearing in the above pop up window, we can start to deploy the campaign by clicking on the ‘Confirm Campaign‘ button.
In order to see the progress of our deployment, select ‘Sent Campaign Report’ under the ‘Reports’ navigation tab. This screen is shown in Figure 2.6, below. You can filter ‘Email Type’ by ‘segmented campaign’ to bring only segmented campaigns into view. Click on the ‘Search‘ button, as shown in Figure 2.6, below.
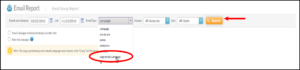
Figure – 2.6 Report Search drop down to select Segmented Campaigns
On clicking the ‘Search‘ button, all the segmented lists for the given date range are displayed on the page. The newly created segmented campaign appears with a ‘segmented_campaign_new‘ status, as shown in Figure 2.7 (see the first record in the below table).

Figure – 2.7 Segmented Campaign in the Sent Email Report
The first record in Figure 2.7 shows a status of ‘segmented_campaign_new’, which means this is the latest segmented campaign created. In order to see all the segments inside this segmented campaign, click on ‘View Segments‘ link appearing in the same record. The page shown in Figure 2.8, will be loaded after clicking on ‘View Segments’ link.
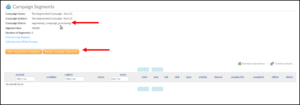
Figure – 2.8 Campaign Segment view in the Email Reports
The top left section in Figure 2.8 shows that the status of the segmented campaign has changed from ‘segmented_campaign_new’ to ‘segmented_campaign_processing’, which means that the process of creating actual segments is in progress. At campaign outset, it shows number of segments equal to 0. Clicking on the ‘Reload Campaign Segments‘ button, shown in Figure 2.8, after a brief pause will refresh the data on this page. An example of updated Campaign Segments is shown in Figure 2.9.
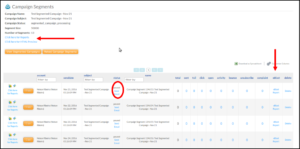
Figure – 2.9 Campaign Segments
In segmenting the 600,000 contacts into segments of 50,000 for this example, 12 segments should be created. However, Figure 2.9 shows that the total number of segments is 13. This additional segment is created during the upload process to contain all the contacts with duplicate email addresses. For this example, there will be 13 segments at the end of this process IF one or more contacts is a duplicate with respect to email address in the CSV file that was originally uploaded (See Figure 1.2).
Now all the segments are ready to be processed. By default, the status of each segment is ‘paused‘, as shown in Figure 2.9. In order to process a segment, click on the ‘Send Email‘ link appearing in the ‘Status’ column of that segment. Clicking the ‘Send Email‘ link will update the campaign segment status from ‘paused‘ to ‘new‘ to engage deployment. Each segment is then processed at its preconfigured time interval (see Figure 2.4).
When the campaign has sent, you can view the statistics in the ‘eBlast Report’.
The ‘eBlast Report’ for each segment can be viewed by navigating to the ‘Reports’ link in the ribbon and selecting ‘Sent Campaign Report’ from the drop-down menu. You can view the eBlast Report for the campaign segment either by clicking on the icon or the reports link located next to it, as shown in Figure 2.10.
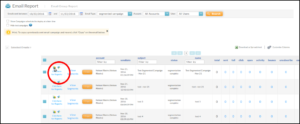
Figure – 2.10 Accessing eBlast Reports for a Segmented Campaign
Alternatively, you can open the ‘eBlast Report’ of a segmented campaign by clicking on the ‘Click here for Reports‘ link appearing above the table, so clicking on the ‘eBlast Report’ link in the ‘eBlast’ column, both shown in Figure 2.9.
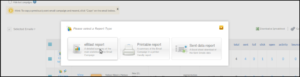
Figure – 2.11 Selecting Report Type
Upon clicking the report link shown in Figure 2.10, a pop-up window appears, as shown in Figure 2.11. From here we can open the eBlast report for a campaign segment.