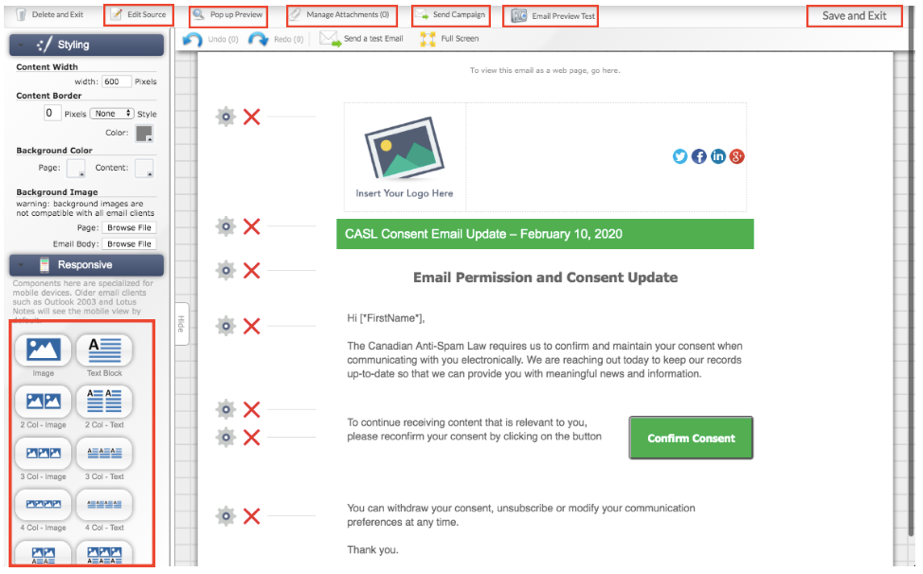
When designing or editing a template, Components can be dragged and dropped onto the email editor.
To edit the HTML code, click the Edit Source link. Click Save Source (from the Edit Source page) to go back to the drag and drop editor.
To view what the template will look like as an email, click the Pop-up Preview link.
To add attachments to the template, click the Manage Attachments link.
To use this template in an email campaign, click the Send Campaign link.
To view what the template will look like in various email clients, click the Email Preview Test link.
When the template is complete, click Save and Exit.
Manage Attachments:
This feature allows you to add attachments to your email communications by creating a link to your attachment which you can then easily embed in the main body of your email.
Click the +Browse button to find a file in the document library. Click the upload button to choose the document you would like to attach.
Once the document has been uploaded, double click it. This will create a URL for that document.
Now you can create some text within the body of the email which you would like to link to your attachment. [CLICK HERE TO READ A GREAT ARTICLE]
Next, copy the documents URL, then highlight the text and click on the link button. Paste in the URL and click OK.

Send Campaign
Once you have the template ready, clicking on the ‘Send Campaign’ link in the template editor will redirect you to the Email Campaign’s navigation page where you can add the final deployment list and confirm the campaign for the selected template.
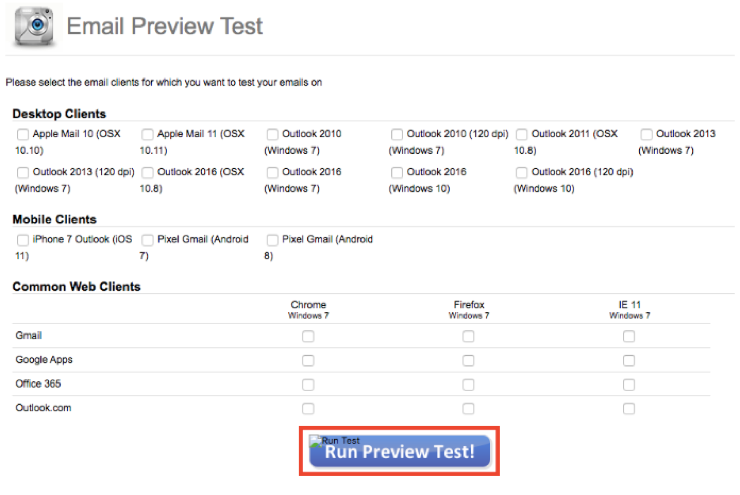
Email Preview Test:
Select the email clients you wish to run the preview test through, and then click Run Preview Test!
Editing and Styling Components:
Hover over a Component on the template to display buttons to edit, move, duplicate, style and delete the Component.

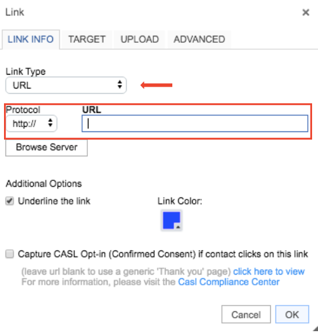
Hyperlink Text:
Click a text component to display the following edit box:

Step 1) Highlight the desired text.
Step 2) Click the icon from the text editing box (as above).
Step 3) Specify the Link Type.
Step 4) Enter the URL and adjust the Protocol if necessary.
Step 5) Click OK.
Hyperlink an Image:
Step 1) Click the desired image.
Step 2) Enter the desired link in the Link URL field.
Step 3) Select whether the link will be opened in a new window.
Step 4) Click Save.
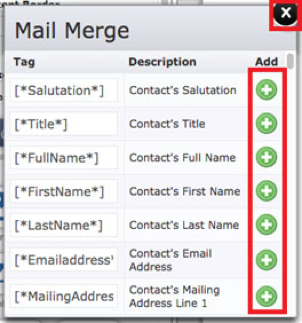
Create a Mail Merge:

Step 1) Highlight the desired text.
Step 2) Click the @MailMerge link from the text editing box.
Step 3) Click the Add icon beside the appropriate Tag.
Step 4) Close the Mail Merge box.